
Organizing Chaos Part 3 - Mastering Manuscript Organization in Microsoft Word
One Manuscript to Rule Them All!

After careful consideration, I've decided to share my manuscript-writing process, which follows the same techniques I employ for crafting my book of lore, as demonstrated in my previous post, Organized Chaos Part 1: Creating a World Compendium using Microsoft Word. While I approach this article from the perspective of a self-published author, the majority of my workflow can be adapted by traditional authors as well.
Workflow
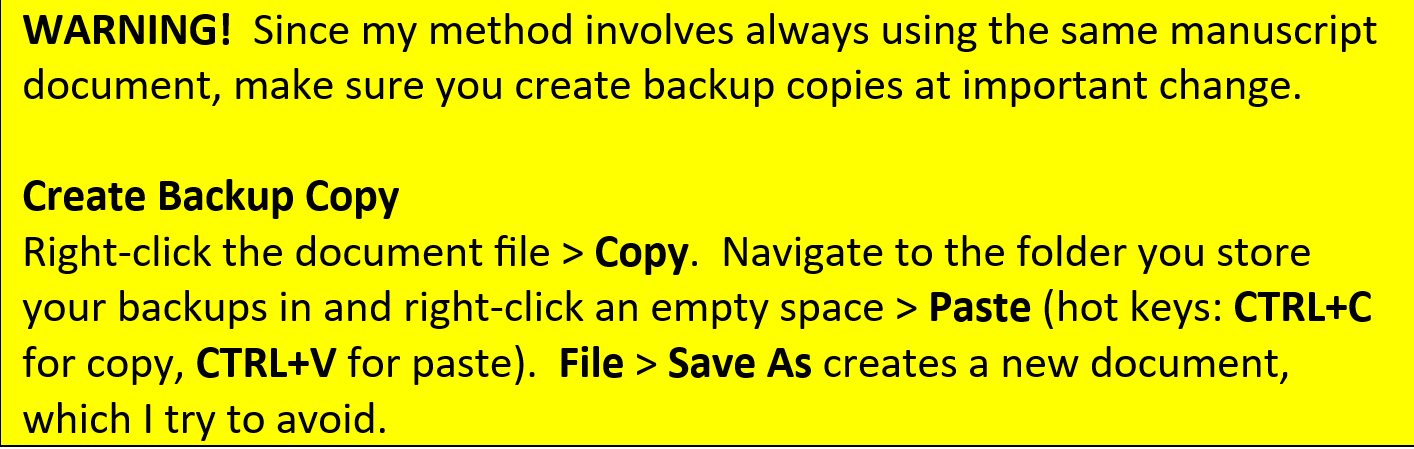
From initial outline to the final manuscript, I rely on a single Microsoft Word document. My method involves a constant cycle of adding, moving, and deleting headers. Whenever a significant change occurs, I create a backup copy of the original document to preserve past edits.
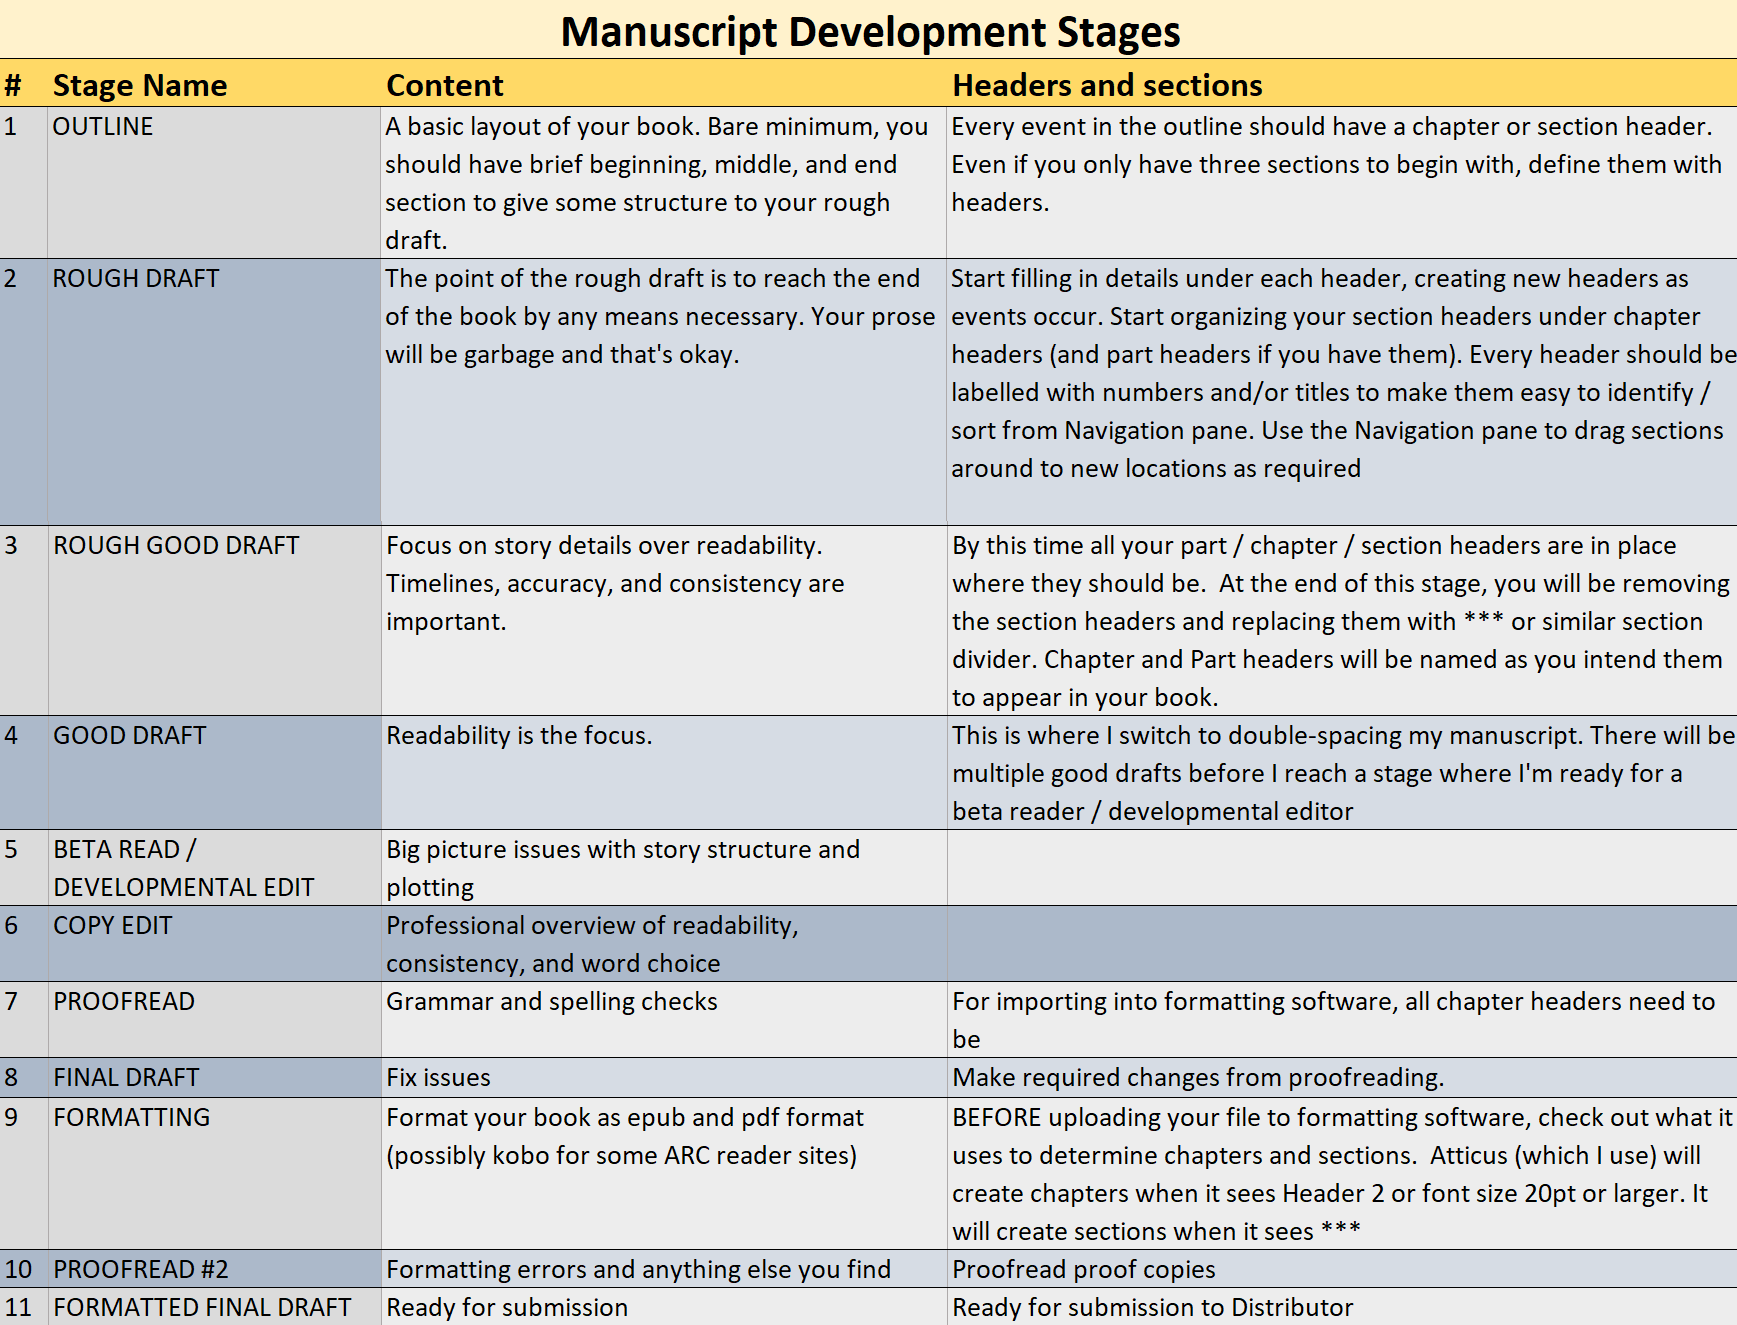
Below, I provide an overview of the Manuscript Development Stages I follow as a self-published author. Keep in mind that your approach may vary.
A Page From SEPARATE WORLD’s Rough Good Draft
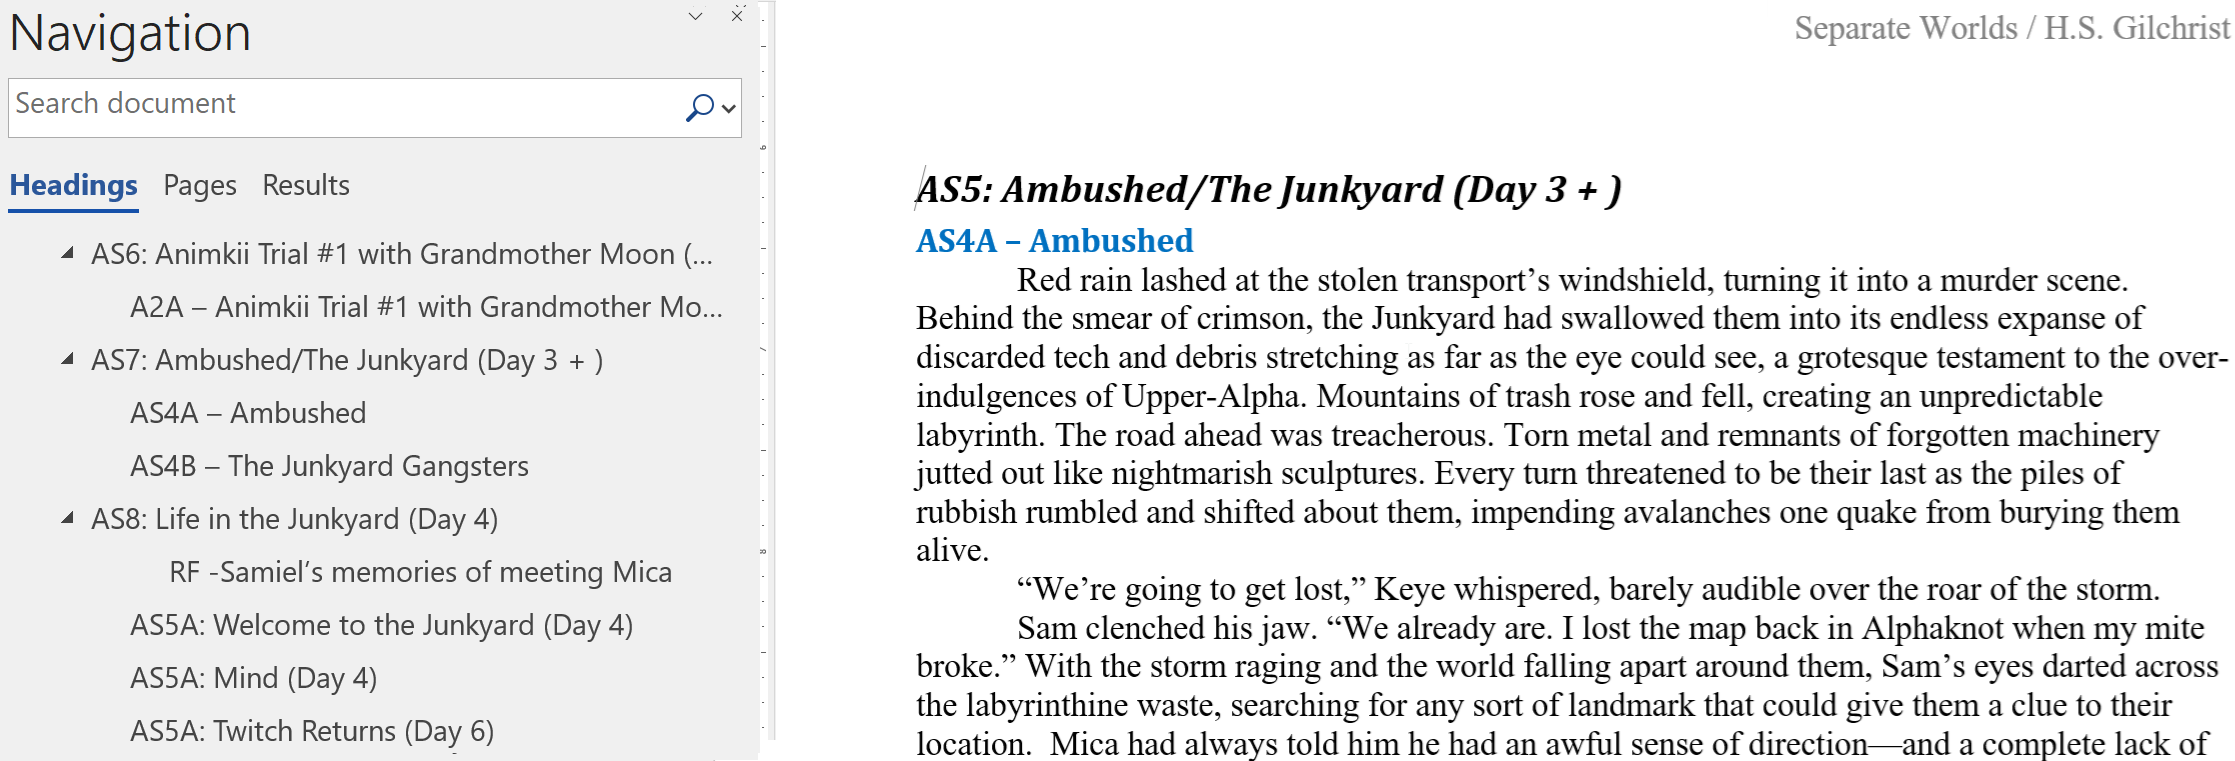
To provide you with a visual of my method, here's a screenshot from Book 2 of my series, "THE PRIMORDIAL ENGINE: SEPARATE WORLDS" (warning: contains spoilers). At this stage, it's in Rough Good Draft mode, so readability might still be a bit rough around the edges.
The Importance of Headers
Headers play a pivotal role in this process:
The Navigation Pane offers a comprehensive list of all your headers, allowing for easy navigation. You can expand or collapse this list as needed.
The Navigation Pane enables you to effortlessly drag headers (and their content) to new sections—the "cue card" feature of Word.
Building Your Manuscript
Preparation
Basic manuscript layout
Begin by establishing a basic manuscript layout. If you're unsure of industry standards, Reedsy provides a comprehensive guide in their article, How To Format a Book Manuscript article. For now, our focus is on organizing your drafts. Ensure your manuscript formatting is in place before commencing your drafts, though I recommend holding off on double-spacing until the Good Draft stage.
Set up Headers
If you're unfamiliar with using Headers and the Navigation Pane in Microsoft Word, I recommend reviewing my previous post, Organized Chaos Part 1.
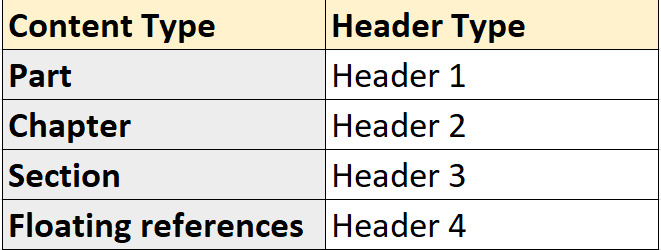
Here are the settings I use for my manuscript:
Understanding “Floating references”?
Floating references are headers that contain “quick notes” that you can move between sections for reference during your writing process. For instance, during my rough draft, I created a floating reference header that had a table containing character names and quick descriptions. As I moved through section, I dragged this floating reference table to subsequent sections using the Navigation Pane. Once I no longer needed it, I simply deleted it.
Decide Header Naming Convention
For maximum efficiency, establish a consistent naming scheme for your headers.
Be Aware:
You don't need to use chapter headers or numbering initially—especially when you're still finding your story's order.
Expect to rename and reorder sections frequently during the Rough Draft stage. By the time you reach the Rough Good Draft, your order should be largely finalized.
Your chapter and section header numbers don't necessarily have to match. In my case, I have three main storylines progressing simultaneously (denoted by character initials), so my section numbers align with their storyline progression, not the chapter order.
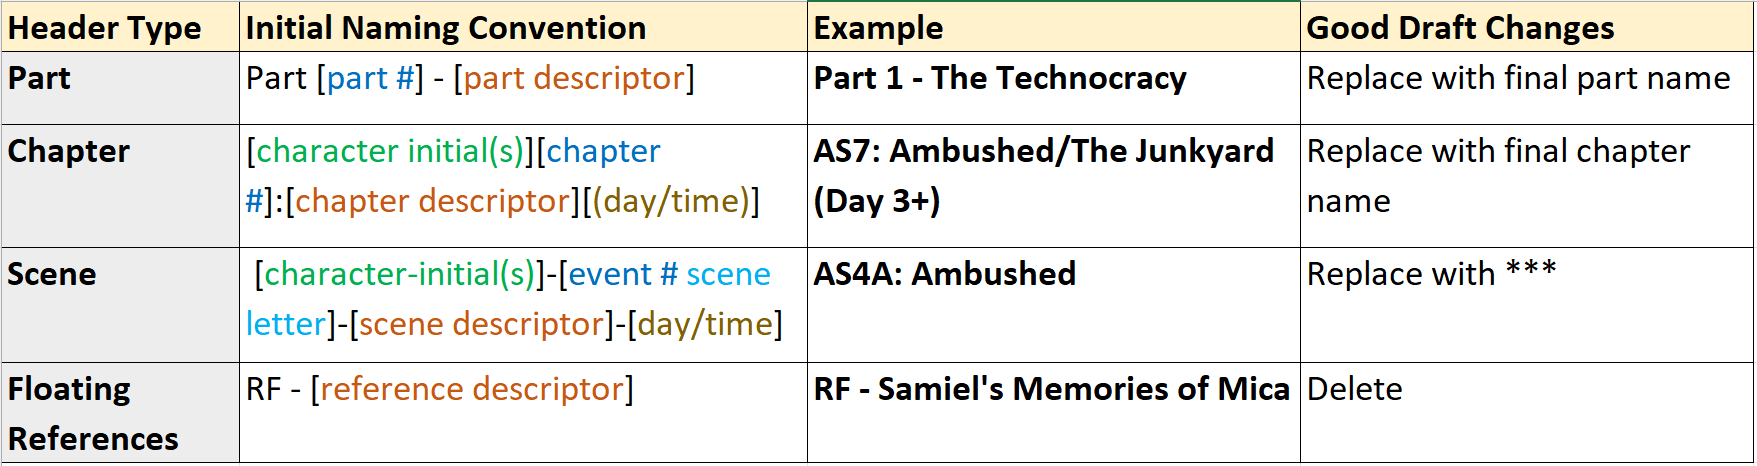
Here are the naming conventions I employ:
Now, let's move on to building your manuscript.
Stage 1: Outline
Goal: Create a basic structure for your story. I try to focus on big events I know I want to happen and write around those events. At the least, provide three events: beginning, middle, end. Keep in mind that these outlines are not set in stone; feel free to include any ideas you have.
My Personal Approach:
Create chapter or section headers for each event in your outline. You may not be certain whether they will become chapters or sections at this stage, but you can make adjustments later.
If you're unsure of the order of events, skip numbering for now.
Write a brief paragraph for each section.
For example, in my first book, THE END OF THE WORLD, I outlined an event as follows
Chapter header: M1: Mica is a captive of the After Cult (Day 1)
Paragraph: I outlined the general concept of what I wanted to achieve with this event, which turned into multiple section headers in the Rough Draft.
Stage 2: Rough Draft
Goal: Get it done! During this stage, your primary focus should be to progress from the beginning to the end as rapidly as possible, incorporating all key events. Avoid getting bogged down in grammar, consistency, timelines, or other minutiae. Create floating reference headers to carry along information you need to quickly reference, like side character names.
My Personal Approach:
Continue working within the same document you started as an Outline.
Add events (section and chapter headers). Start by inserting more events under the existing Outline headers. If inspiration strikes, feel free to write the complete story for an event without concerning yourself with headers until you finish. The key here is to capture as much of the narrative as fast as possible before moving onto the Rough Good Draft.
Group section headers under chapter headers. For instance a chapter header could be named "Battle Scene at Hillside" and you would stick related section headers under it. Use the Navigation Pane to click and drag headers to the appropriate locations.
Finalize order of events. Add numbers to header names (optional)
Continue adding content and rearranging until your Rough Draft evolves into a cohesive story with a reasonably accurate timeline, even if the prose remains clunky, incomplete, and in need of refinement.
Stage 3: Rough Good Draft
Goal: Timelines, accuracy, consistency. Replace section headers with section dividers, and chapter headers with chapter names. While the prose should improve during this stage, don't worry too much about refining it—that's what the Good Draft is for.
My Personal Approach:
Start from the beginning and:
Verify timelines.
Ensure accuracy by referencing your research and lore notes.
Verify consistency (reference your research/lore notes)
Fill in missing details.
Once you're satisfied that your story flows coherently, replace section headers with section dividers (e.g., ***), and rename chapter and part headers to the final titles you intend to use in your final manuscript.
Expectations once complete:
While the prose may still be somewhat rough, it should be of sufficient quality to share with others.
Your story should be cohesive from beginning to end.
The need for floating reference sections should be eliminated.
Stage 4: Good Draft
Goal: Achieve readability
My Personal Approach:
Verify that your manuscript layout is properly formatted (refer to the "Basic manuscript layout" section above). During the Good Draft stage, I typically double-space my manuscript.
Use ProWritingAid to find grammar/spelling issues.
Continue to revise based on feedback in Stages 5-7.
Stage 5: Beta Read / Developmental Edit
Goal: Identify"big picture" issues with story structure.
My Personal Approach:
I've previously shared my experiences with a developmental editor in Surviving the Grammar Apocalypse: Is an Editor Your Ultimate Ally? Part 1. Be prepared for a comprehensive revision of your Good Draft following a developmental edit.
Stage 6: Copy Edit
Goal: Enhance grammar and readability
My Personal Approach:
In Surviving the Grammar Apocalypse: Is an Editor Your Ultimate Ally? Part 2, I delve into my experiences with hiring a copy editor. If you conducted thorough grammar checks, implementing the edits should be a relatively swift process, typically taking less than a week.
Stage 7: Proofread
Goal: Identify spelling mistakes, grammatical errors, and other overlooked issues.
My Personal Approach:
Do a meticulous line-by-line check for typos, missed words, or other issues previously missed.
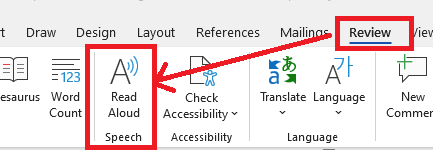
Use Microsoft’s Read Aloud (Review > Read Aloud) to read the manuscript out loud. Sometimes a fresh perspective helps locate issues.
Stage 8: Final Draft
Goal: Prepare for formatting or agent/publisher submission.
Formatting Tip!
Before uploading your manuscript to formatting software, familiarize yourself with how it interprets formatting in the source document. For example, in my case, Atticus translates Header 2 as chapters and *** as section dividers. It ignores page headers and footers.
My Personal Approach:
Convert all remaining headers (which should now consist of part and chapter headers) to Header 2 format.
Double-check that all sections are correctly marked with ***.
Eliminate any formatting that may not be compatible with the formatting software. In my experience, this step is often minimal, but other authors may encounter specific issues.
Stage 9: Formatting
Goal: Format manuscript for e-books (epub, mobi) and print books (PDF).
My Personal Approach:
Upload the final draft to Atticus.
Configure Atticus themes, settings, and layout to align with your desired formatting style.
Export epub and pdf files (Atticus doesn’t do mobi format).
Stage 10: Proofreading #2
Goal: Proofread epub and PDF files.
My Personal Approach:
Upload the epub version to Kindle and perform a thorough proofread. Reading from a device provides a reader's perspective, often making it easier to spot remaining issues.
Fix any new typos or formatting issues using Atticus (in Atticus, exporting back to Word format is a little messy, so it’s easier to make new edits using the formatting software).
Stage 11: Formatted Final Draft
Congratulations! You're now ready to upload your files to your chosen distributors and embark on the next exciting phase of your journey as an author.

You are just totally organised eh! I'd never do all that in a single document - it just gets confusing and harder to edit the more detail there is. I'd have a basic idea document, then a basic outline document, then that doc would get embellished with ideas until it gets saved as a new doc being the 'detailed' outline, then the next one would be maybe a scene by scene outline - that's the most important one, as you can check continuity and any gaps etc.; then the fun part comes last which is the writing it. Except I always get too inspired so the detailed outline ends up being the first draft, then I do the scene by scene, then edit the draft. And all that without a navigational aid. Maybe that's why I get so disorganised. I salute your organisational skills and self-discipline. I end up relying on my memory. Not what it once was...
Wowo! Your process is 1000x more organized than mine. I'm not a charts and graphs person, so that chart at the beginning outlining each step quite impressed me.
Sharing this to Notes in case anyone else finds this article helpful. :)